Wikipedia

Search results

Thursday 4 August 2016

How I Made LED Strip Light (for Aquarium or Anything Else)


assalaamu'alaikum :)
above is the photo of my aquarium after LED strip lighting installed. nice :?

Here are the steps I did:
  1. bought "LED 5730 Strip with built in aluminium heatsink strip" from tokopedia.com. it is only priced IDR 30,000/meter (contains 72 LEDs).

   according to the seller, it was 36 Watts LED. however it is impossible LED is setup in its' max power limit. Otherwise it is already dead :).

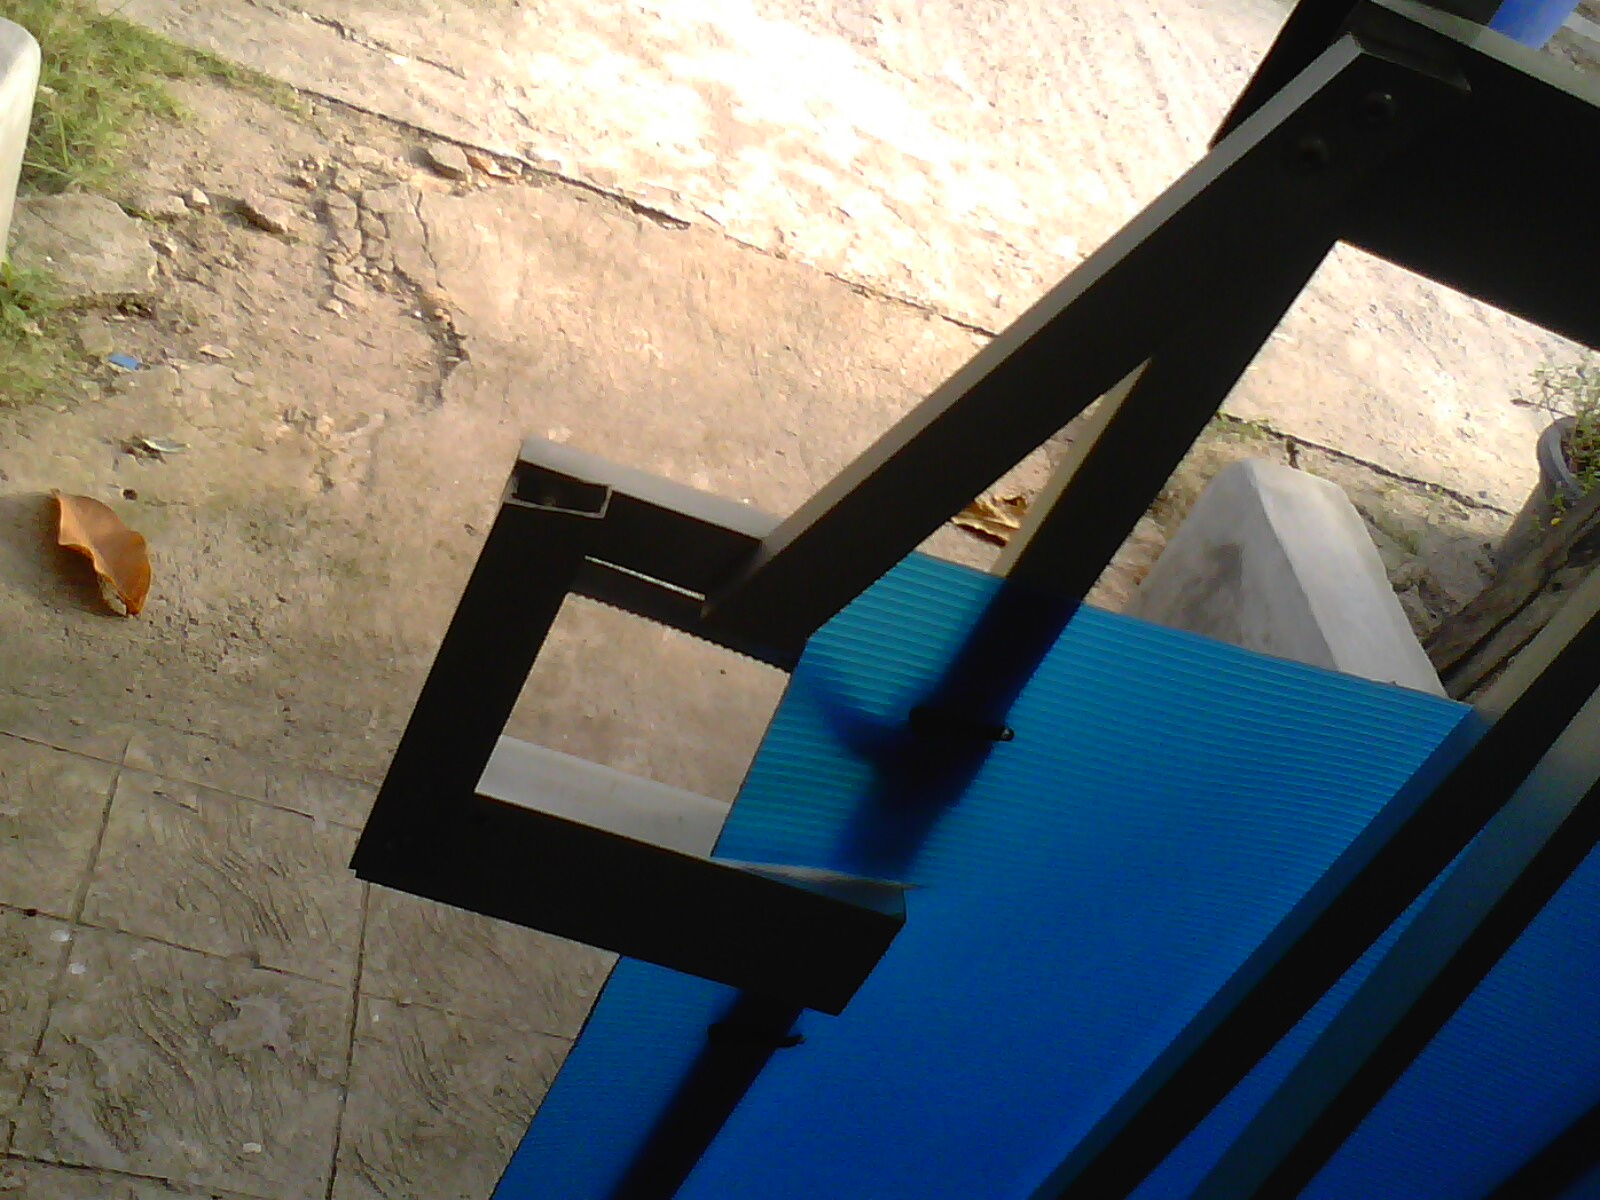
2. cut the LED strip into 2 halves using cutting pliers, then glue onto PVC rectangle conduit (IDR 3,500) using Silicone glue (IDR 5,000). note: aluminium bar (15,000 / 6 meters) is better since aluminium can help dissipating heat and as well as very strong metal frame for the LED.

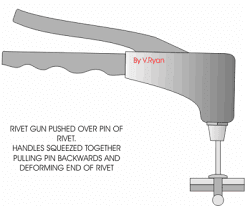
3. Join the PVC/aluminium frame using superglue or rivet nail. 

4. bought second hand AC-DC Adaptor (IDR 25,000: 24 volts 2 Amperes, because I solder the LED in series 12Volts x 2)


5. OK, then try it up on my floor: quite bright!


6. Set it on my aquarium.... awesome


at night, it induce photosynthesis too:


Photosynthesis video: you can see the Oxygen bubbles were coming out from the leaves!!!


Thursday 30 June 2016

How I Made My House Gate of Aluminium

How I Made My House Gate of Aluminium


Hi friends,
this project is something I newly learnt and practiced about 3 months ago, which is about aluminium tube assembly and joining (which is: RIVETING).


Riveting is very interesting, since the process is quite quick and strong. it is also neat and state of art.

Further benefit: I saved money of around IDR 1,000,000 (US$ 80) with making this myself rather than ordering a welded iron gate. Yet the most interesting this is still I can create is myself; such an excercise, hobby and creativity :)

Ok, let's take a look how I made it:

Constructed the lock handle & safety:


Mounted the padlock on pillar using wood and screw:


the lock from front side:


Joined 2 aluminium square tubes using rivet nail:


Mounted the plastic cover/shield to aluminium square tube using black (UV resistant) Cable Tie:


The other side of rail lock: using Hook to hook metal clamp:


Lower side is the same:


I mounted 4 wheels using screws to the gate base:


Operation Photo:)


What a nice DIY. isn't it?  :D

Monday 16 May 2016

Cheap and Small Aquaponic Auto Siphon (Growbed Space Saving) by Mohammade9


Cheap and Small Aquaponic Auto Siphon

Assalaamu 'alaikum,
This project will be useful for whose space within growbed is a problem, or have only a "small" growbed.
Just like my problem, I intended to "start practicing" in aquaponic world using smaller scale growbed. Searched around reference from internet, mostly recommend BELL SIPHON.
Unfortunately this kind of siphon occupies too much space within growbed. This is not so kind for my small growbed :) Because we want to grow as many plantation as possible :)

Step 1: Make Your Solid (Grow Media) Filter using Small Bottle!

Picture of Make Your Solid (Grow Media) Filter using Small Bottle!

IMG01045.jpgIMG01046.jpg
IMG01047.jpg
IMG01050.jpg


IMG10348.jpg


OK, this is important point since effective growing space in growbed is to be made as much as possible.
  • Search for small unused plastic bottle (I recycled ex. cajuput oil bottle - made in Indonesia). Wash it thoroughly to ensure no harmful chemical left to your fishes and plants!
  • if you do not have small plastic bottle, you can use long bottle then cut the mouth and the bottom from the body (see above 2nd - 4th photos), then join them together using glue.
  • once you select the plastic bottle, drill some hole (5th photo). I found punching holes using heated nail (6th photo) is neater than using hand drill. And it was also faster.


Step 2: Install Your Solid Media Filter

Picture of Install Your Solid Media Filter


IMG01056.jpg


    IMG01057.jpg
  1. Drill a hole at the water lowest level of your growbed. Mine is around 3cm from growbed base. Enlarge the hole using your drill by moving it around until close to your bottle Outer Diameter (tight-fit is better/stronger, Photo 1)
  2. Insert your small bottle (Solid Media/Gravel Filter) to the hole, apply glue at the interior and exterior
note: I found small water leakage on this gluing process is not critical. This siphon is still working fine even with small leakage.

Step 3: Build Your Outer Siphon


1.    Shape PVC tube as per Figure 1 (U Siphon). You can use elbow for more beautiful look (Figure 2). However I prefer using “heat and bend” method, using what I have on hand to minimise cost and shopping time.
2.    Join the “Water Lowest Level” end to your “Solid Media Filter” using glue. If both diameters are tight-fit, you can skip glue. Small water leakage is fine. My siphon is still working fine though it has small leakage.

Note:

  • ·         There is one other good thing about tight-fit mechanism; you can rotate the siphon tube to adjust “water highest level”. It is feasible though the cycle is running.
  • ·         90° bend at outlet is optional, to ease the auto siphon to start. I removed this in my 2nd siphon. If you remove it, ensure the “outlet” is kept below “Water Lowest Level”. Otherwise, your siphon will not stop at intended lowest level.
  • ·         “Water Highest Level” determines the maximum level of water in your growbed. It shall be around 5-10 cm below media for good aquaponic result: avoiding invasive algae growth. Good indication for this is when you can see growbed media top is dry, then algae will never grow on it.
  • ·         “Water Lowest Level” determines the minimum level of water in your growbed. I set mine around 4 cm from bottom of growbed. This space is for nitrification bacteria to live in.
  • ·         Best minimum grow media depth for all kind of veg is 30 cm (ref: FAO).
  • ·         ½” PVC tube is actually too big for small growbed. The “ebb and flow” cycle become too short for my small growbed. You can use smaller tube if it is available in your country. Other non-degradable material is OK to use (e.g.: stainless steel, brass, anodised aluminum tube)


Step 4: Test and Use It!


Flow water into your growbed tank before adding media (Figure 1).
Ensure the “ebb and flow” cycle is running correctly at intended highest and lowest level. If no, adjust the inlet water flow using ball valve.
Too fast inlet water flow will cause siphon never stop, too slow will cause siphon never start.
Once you are sure the cycle is consistently running, you can add media. My siphon is still working fine till today (6th day: Figure 2). 


You can see the sprouts are growing (Figure 3).

Finally, feel free to leave a comment or post a question of any problem you have with your siphon. I can also barely answer a question about “bell siphon” J.

Monday 9 May 2016

Super Cheap Aquarium Cleaner

Super Cheap Aquarium Cleaner
I also share this small project in instructables:

http://www.instructables.com/id/Super-Cheap-Aquarium-Cleaner

This project will inspire you a cheap alternative way to clean your aquarium inner side.

Step 1: Prepare your material and tool

Picture of Step 1: Prepare your material and tool
Here is list of materials needed:
  • Any hard and long stick, minimum same length as your aquarium depth.
    • I recycled paint roller stick for mine
  • Dish-washing sponge (usually come with 2 sides: soft and hard).
    • price: IDR 2,000 - 8,000 (below $1)
Tools needed:
  • mini screwdriver to punch the sponge
  • cutter/scissors to cut a groove the sponge

Step 2: Prepare the Hole and Groove

Picture of Step 2: Prepare the Hole and Groove
  1. Punch the dish washing sponge using your mini screwdriver, follow the pattern of your stick.
if your stick made from metal, it could be re-shaped by bending it over and around.
2. cut the sponge with your cutter/scissors, also follow the bending pattern of your stick.

Step 3: Assemble Them!

Picture of Step 3: Assemble Them!
Iinsert your stick tip into the hole you punched, and slip it to the groove you cut as shown

Step 4: Test it!

Picture of Step 4: Test it!
IMG10351.jpg
It is done! test it by wiping into your aquarium wall glass.
IMG10350.jpg
It should be quite easy, even my 5 years old daughter could do it easily :)
feel free to leave a comment or suggestions :)

Wednesday 6 April 2016

Automatic Water Pump ON and OFF (2005)

Automatic Water Pump ON and OFF (2005)


This interesting project dated back in 2005 where I was still searching for 2nd job after finish 1 year Internship/On-The-Job training from Atambua City (NTT). The reason I searched for other job was because I believed I deserved something better, because I am always different than other :).

Ok, let’s check what’s so special with this interesting project…
I designed this for my Teacher/Mother house. A small dedication :). This electronic circuit will automatically turn on “electric water pump” after the “lower sensor” is triggered (means the water tank is [almost] empty). After some time the water pump is on and filling up the tank, the “upper sensor” later will be triggered when the water tank is [almost] full. Once “upper sensor” is triggered, the circuit will turn the pump off. It will stay off until the “lower sensor” is triggered again (back to first state in the cycle).

Here we go with the finish view: 


Assembly guide:
  • Attach the “auto water pump On and Off” (let’s shorten it as “device”) to nearby water tank.
  • Put the water empty sensor (lower sensor – contains of two electrodes) to lowest water level you want it to be detected as empty.
  • Put the water full sensor (upper sensor) to the highest water level you want it to be detected as full.
  • Attach this device to input voltage 220V and the water pump you want to automate.


Let’s review the schematic I designed:


  • This device is powered by 12V DC adaptor as you can see above. It has a 12Vdc relay, 2 NPN universal transistors and sets of electrode. The electrodes I use made of enameled diameter 1mm wire. I stripped the end as a conductive sensor.
  • Water pump is ON by default, because of relay NC position (NC means Normally Close). It is not energised by the transistors.
  • When the water is filling up the tank and touching upper sensor, there will be resistive connections from +12V electrode to upper sensor and lower sensor by the water (Java water resistance is around 10K Ohms). The water resistance will give current around 11mA to base of both transistors. 

Ib = (12V-0.6V)/10K = 11.4mA
Ib is base current
0.6V is Vbe

  • Both transistors is then turned on by the Ib (Ic = hfe*Ib = (hfe around 300)*11.4mA = 3.4A, note that the actual Ic current will depend on actual relay usage and transistor maximum Ic rating which is only around 100mA for BC547). This cause negative pin of Relay is LOW/connected to ground. The relay is energised.
  • Energised relay pull its’ switches to NO (Normally Open). Note that left switch bypass upper transistor and let the relay always energised provided lower transistor is still on (=lower sensor is still immersed in water). Energised relay switches the water pump off.
  • When the water is used by user, the tank will run empty. Lower sensor will no longer be immersed. Lower transistor doesn’t receive base current, means collector current is also 0. This transistor is off, relay is disconnected from ground; relay is not energised.
  • Un-energised relay turn the water pump on… and repeat the first state of this cycle.


Above circuit was designed when I was just graduated from my technology high school. I didn’t understand so much about circuit durability and safety. Now I understand, let us see improvements I drafted in below schematic.


  1. Added 1.5K Ohms resistors to electrodes – this avoids shorting +12V power supply to ground by transistor base-emitter (which is only 0.6V) in case the electrodes were accidentally shorted. Otherwise, the adaptor or transistor will be blown off. This case can be happened e.g. when we clean out the tank and accidentally short the electrodes. Independent resistors ensure each base may have different needed bias voltage. 
  2. Added diode in parallel with Relay – to swap off spike voltage generated by relay’s inductor when it is “suddenly” turned on. The shunt voltage can damage adaptor and transistors.
  3. Replaced stripped enamel electrodes with rust-proof electrodes. I remember the stripped enamel was “electrolised” or oxidised (collecting water’s oxygen). When operating. In long term, it will be rusty. Tin(Sn)/Zn/Ag/Au/Cr/Ni coating on a “built in terminal” will be useful to prevent the rust. Simple and cheap example is AC plug bought from hardware store.

That’s all. Feel free to write a comment or any question. And most importantly, I hope this invention is useful to a lot of people :).


Thursday 24 March 2016

First TV Super Antenna (Gray Hoverman) in Indonesia!

Yes, you are not mistaken in reading above title  :)
I only dare writing this title after try to search 3 times, and found NO POST about making Gray Hoverman Super Antenna from Indonesia! Just there is one blog from Malaysia :)
Here is the snapshot:


What is so special about this antenna? why shall they put a nick name as Super Antenna? it is because this antenna has a very wide band (simply talking: you can pick FM Radio, VHF and UHF using only one antenna!). Then the gain out-competes all of other commercial (& expensive, around US$ 30) high quality antenna in US! For the theory, design and research result, follow this link: http://www.digitalhome.ca/ota/superantenna/. you can build and sell as many as you can since it is licensed under GPLv3 (General Public License)

Design schematic from above site:


important advice from 300ohms (expert user nickname from above web forum):
  • reflector to active elements distance 100 mm. do not be farther.
  • cut reflector slit around 1 inches (separating gap between left and right reflector) - will result in additional free 0.5 dB gain
  • increase distance between active elements to be minimum 89mm to obtain free gain of 0.75dB
  • transmission cable 50 feet maximum, because there will be loss around 1dB/50ft


While for my experiment:
  • using indoor built-in antenna: captured only 3-4 UHF channels + 0 FM radio.
  • AFTER using outdoor Gray Hoverman Antenna without reflector, 6 meters height: captured 1 VHF + 13 UHF channels + 11 FM radios! This includes TV5 (VHF), Mediacorps #, Mediacorps U, Channel News Asia from Singapore and TV3, TV9 from Malaysia. Plus TransTV, NET, MNC, MetroTV, Indosiar... etc from Indonesia! Awesome! The FM radios mostly captured Singapore and Malaysian stations, since Batam stations is not so many.
  • update after adding mesh reflector (chicken mesh): received 18 total Channels! Wow!! Additional TV7 (malaysia), Mediacorp asantham (Singapore), etc. but the Singapore VHF TV5 lost its' signal. I am not sure why. It looks like the reflector reduce gain in VHF channels. Sad :( because I like watching english news from TV5.


Here are the photos of my DIY Super Antenna (using cheap PVC tube, joints, and galvanised steel 2.5mm wire):


Here is the build cost: 

  • 2.5mm Diameter galvanised steel wire around IDR 6,000 (my case is free). 
  • PVC tube: 2 meters x IDR 8,000
  • PVC joints: 4 pcs x IDR 3,000
  • 15 meters Antenna cable (75 Ohm): IDR 22,000 (cheap cable made in china)
  • Black high quality Cable Ties (UV resistant): IDR 11,500
  • Super glue (alteco/loctite), plastic hot-melt glue: around IDR 10,000 (mine is actually used/free)
  • used Compact Disc, Plastic cap, electric tube (all are for mounting): free
  • Total cost:  IDR 39,500 excludes the 15m cable. 
note: based on my research from internet, best and cheapest antenna material is:

  1. silver (ups, sorry this is not cheap!)
  2. copper
  3. aluminum
  4. galvanised steel
However all metal above (except silver) will become rusty/corroded which deteriorate the conductivity. Hence you must provide "protective coating". In my antenna, I used my stock of aerosol clear coating (bahasa: philox clear). It's free for me :)


Stands on 6 meters galvanised steel tube:


Comparing with my neighbour, 14 TV channels reception are just awesome! Plus I do not need VHF and FM antenna :) 
It became 21 channels after adding reflector, wow...: